概述:本测试适用于单机es集群化,ELK日志从零开始配置与环境测试,系统为centos7 ,es 默认使用9201、9202、9203端口。由于单机只适用于测试环境,所以不建议在生产环境进行部署,生产环境建议es集群分多台主机多实例,以保障高可用性。
下面是配置的详细过程:
1、系统优化部分
#vim /etc/security/limits.conf
* soft nofile 65536
* hard nofile 65536
* soft nproc 4096
* hard nproc 4096
#echo "vm.max_map_count = 262144" >> /etc/sysctl.conf && sysctl -p
2、环境准备部分
#yum install -y unzip bzip2 wget lrzsz java-1.8.0-openjdk.x86_64
#mkdir -p /usr/{es01,es02,es03} && cd
#mkdir soft && cd soft
#wget https://artifacts.elastic.co/downloads/elasticsearch/elasticsearch-6.3.1.tar.gz
#wget https://artifacts.elastic.co/downloads/kibana/kibana-6.3.1-linux-x86_64.tar.gz
#wget https://artifacts.elastic.co/downloads/logstash/logstash-6.3.1.tar.gz
#tar -zxvf elasticsearch-6.3.1.tar.gz
#echo /usr/{es01,es02,es03} | xargs -n 1 cp -r -v elasticsearch-6.3.1/*
#mkdir -p /usr/{es01,es02,es03}/{data,log}
//新版本都不允许root进行es启动,增加esuser用户
#useradd esuser
3、es机器单机多实例配置部分
编辑es01实例的配置文件:
#vim /usr/es01/config/elasticsearch.yml
##es01
cluster.name: escls01
node.name: esnode01
path.data: /usr/es01/data
path.logs: /usr/es01/log
network.host: 172.25.63.29
http.port: 9201
transport.tcp.port: 9301
transport.tcp.compress: true
node.max_local_storage_nodes: 3
discovery.zen.ping.unicast.hosts: ["172.25.63.29:9301", "172.25.63.29:9302","172.25.63.29:9303"]
discovery.zen.minimum_master_nodes: 2
http.enabled: true
http.cors.enabled: true
http.cors.allow-origin: "*"
编辑es02实例的配置文件:
#vim /usr/es02/config/elasticsearch.yml
##es02
cluster.name: escls01
node.name: esnode02
path.data: /usr/es02/data
path.logs: /usr/es02/log
network.host: 172.25.63.29
http.port: 9202
transport.tcp.port: 9302
transport.tcp.compress: true
node.max_local_storage_nodes: 3
discovery.zen.ping.unicast.hosts: ["172.25.63.29:9301", "172.25.63.29:9302","172.25.63.29:9303"]
discovery.zen.minimum_master_nodes: 2
http.enabled: true
http.cors.enabled: true
http.cors.allow-origin: "*"
编辑es03实例的配置文件:
#vim /usr/es03/config/elasticsearch.yml
##es03
cluster.name: escls01
node.name: esnode03
path.data: /usr/es03/data
path.logs: /usr/es03/log
network.host: 172.25.63.29
http.port: 9203
transport.tcp.port: 9303
transport.tcp.compress: true
node.max_local_storage_nodes: 3
discovery.zen.ping.unicast.hosts: ["172.25.63.29:9301", "172.25.63.29:9302","172.25.63.29:9303"]
discovery.zen.minimum_master_nodes: 2
http.enabled: true
http.cors.enabled: true
http.cors.allow-origin: "*"
4、调试部分
依次启动3个实例:
#su esuser
$cd /usr/es01/bin
$./elasticsearch -d
$cd /usr/es02/bin
$./elasticsearch -d
$cd /usr/es03/bin
$./elasticsearch -d
//查看日志情况
$tail -f ../../es01/log/escls01.log
启动第一个实例日志一直是这样的:
[2021-06-10T11:51:24,633][WARN ][o.e.d.z.ZenDiscovery ] [esnode01] not enough master nodes discovered during pinging (found [[Candidate{node={esnode01}{uY-Tq78pSJG1T42LwUrdjg}{n7ViuIuDSpWCpONs6QFHZg}{172.25.63.29}{172.25.63.29:9301}{ml.machine_memory=16656572416, xpack.installed=true, ml.max_open_jobs=20, ml.enabled=true}, clusterStateVersion=-1}]], but needed [2]), pinging again
启动第二个实例后,再看第一个实例日志:
[2021-06-10T11:51:30,436][INFO ][o.e.c.s.ClusterApplierService] [esnode01] detected_master {esnode02}{RMxZm77GT4anPx2NgmALhg}{_rshXRISS72qxr9uiJ_S1w}{172.25.63.29}{172.25.63.29:9302}{ml.machine_memory=16656572416, ml.max_open_jobs=20, xpack.installed=true, ml.enabled=true}, added {{esnode02}{RMxZm77GT4anPx2NgmALhg}{_rshXRISS72qxr9uiJ_S1w}{172.25.63.29}{172.25.63.29:9302}{ml.machine_memory=16656572416, ml.max_open_jobs=20, xpack.installed=true, ml.enabled=true},}, reason: apply cluster state (from master [master {esnode02}{RMxZm77GT4anPx2NgmALhg}{_rshXRISS72qxr9uiJ_S1w}{172.25.63.29}{172.25.63.29:9302}{ml.machine_memory=16656572416, ml.max_open_jobs=20, xpack.installed=true, ml.enabled=true} committed version [1]])
[2021-06-10T11:51:31,029][INFO ][o.e.x.m.e.l.LocalExporter] waiting for elected master node [{esnode02}{RMxZm77GT4anPx2NgmALhg}{_rshXRISS72qxr9uiJ_S1w}{172.25.63.29}{172.25.63.29:9302}{ml.machine_memory=16656572416, ml.max_open_jobs=20, xpack.installed=true, ml.enabled=true}] to setup local exporter [default_local] (does it have x-pack installed?)
启动第三实例个实例后,再看第一个实例日志:
[2021-06-10T11:53:11,954][INFO ][o.e.c.s.ClusterApplierService] [esnode01] added {{esnode03}{xSE5yn-QQZSZSn3Zn0MWvQ}{IDkjpCoASCqkhEMjScx0pw}{172.25.63.29}{172.25.63.29:9303}{ml.machine_memory=16656572416, ml.max_open_jobs=20, xpack.installed=true, ml.enabled=true},}, reason: apply cluster state (from master [master {esnode02}{RMxZm77GT4anPx2NgmALhg}{_rshXRISS72qxr9uiJ_S1w}{172.25.63.29}{172.25.63.29:9302}{ml.machine_memory=16656572416, ml.max_open_jobs=20, xpack.installed=true, ml.enabled=true} committed version [15]])
5、查看实例启动情况
#exit
# netstat -ntpl
Active Internet connections (only servers)
Proto Recv-Q Send-Q Local Address Foreign Address State PID/Program name
tcp 0 0 0.0.0.0:22 0.0.0.0:* LISTEN 1021/sshd
tcp 0 0 127.0.0.1:25 0.0.0.0:* LISTEN 1002/master
tcp6 0 0 172.25.63.29:9201 :::* LISTEN 11719/java
tcp6 0 0 172.25.63.29:9202 :::* LISTEN 11945/java
tcp6 0 0 172.25.63.29:9203 :::* LISTEN 12106/java
tcp6 0 0 172.25.63.29:9301 :::* LISTEN 11719/java
tcp6 0 0 172.25.63.29:9302 :::* LISTEN 11945/java
tcp6 0 0 172.25.63.29:9303 :::* LISTEN 12106/java
tcp6 0 0 ::1:25 :::* LISTEN 1002/master
//到此,三个实例都已启动完成
6、简单的http测试
# curl -i "http://172.25.63.29:9201"
HTTP/1.1 200 OK
content-type: application/json; charset=UTF-8
content-length: 488
{
"name" : "esnode01",
"cluster_name" : "escls01",
"cluster_uuid" : "yC1WvSfFQ_SWH12IAjjH5w",
"version" : {
"number" : "6.3.1",
"build_flavor" : "default",
"build_type" : "tar",
"build_hash" : "eb782d0",
"build_date" : "2018-06-29T21:59:26.107521Z",
"build_snapshot" : false,
"lucene_version" : "7.3.1",
"minimum_wire_compatibility_version" : "5.6.0",
"minimum_index_compatibility_version" : "5.0.0"
},
"tagline" : "You Know, for Search"
}
# curl -i "http://172.25.63.29:9201/_cat/nodes?v"
HTTP/1.1 200 OK
content-type: text/plain; charset=UTF-8
content-length: 368
ip heap.percent ram.percent cpu load_1m load_5m load_15m node.role master name
172.25.63.29 8 98 0 0.02 0.03 0.05 mdi * esnode02
172.25.63.29 10 98 0 0.02 0.03 0.05 mdi - esnode01
172.25.63.29 8 98 0 0.02 0.03 0.05 mdi - esnode03
# curl -i "http://172.25.63.29:9201/_cluster/health?pretty"
HTTP/1.1 200 OK
content-type: application/json; charset=UTF-8
content-length: 460
{
"cluster_name" : "escls01",
"status" : "green",
"timed_out" : false,
"number_of_nodes" : 3,
"number_of_data_nodes" : 3,
"active_primary_shards" : 0,
"active_shards" : 0,
"relocating_shards" : 0,
"initializing_shards" : 0,
"unassigned_shards" : 0,
"delayed_unassigned_shards" : 0,
"number_of_pending_tasks" : 0,
"number_of_in_flight_fetch" : 0,
"task_max_waiting_in_queue_millis" : 0,
"active_shards_percent_as_number" : 100.0
}
7、安装es网页查看插件elasticsearch-head
#cd && cd soft
#wget https://nodejs.org/dist/v15.8.0/node-v15.8.0-linux-x64.tar.gz
#tar -zxvf node-v15.8.0-linux-x64.tar.gz && mv node-v15.8.0-linux-x64 /usr/nodejs
#cd /usr/bin/ && ln -s /usr/nodejs/bin/node ./node && ln -s /usr/nodejs/bin/npm ./npm
# node -v
v15.8.0
# npm -v
7.5.1
#cd && cd soft
#wget https://bitbucket.org/ariya/phantomjs/downloads/phantomjs-2.1.1-linux-x86_64.tar.bz2
#wget https://github.com/mobz/elasticsearch-head/archive/refs/heads/master.zip
#unzip master.zip && mv elasticsearch-head-master /usr/elasticsearch-head
#tar -jxfv phantomjs-2.1.1-linux-x86_64.tar.bz2 && mv phantomjs-2.1.1-linux-x86_64 /usr/phantomjs
#cd /usr/bin/ && ln -s /usr/phantomjs/bin/phantomjs ./phantomjs && phantomjs -v
2.1.1
#cd /usr/elasticsearch-head && npm install
#nohup npm run start &
访问:
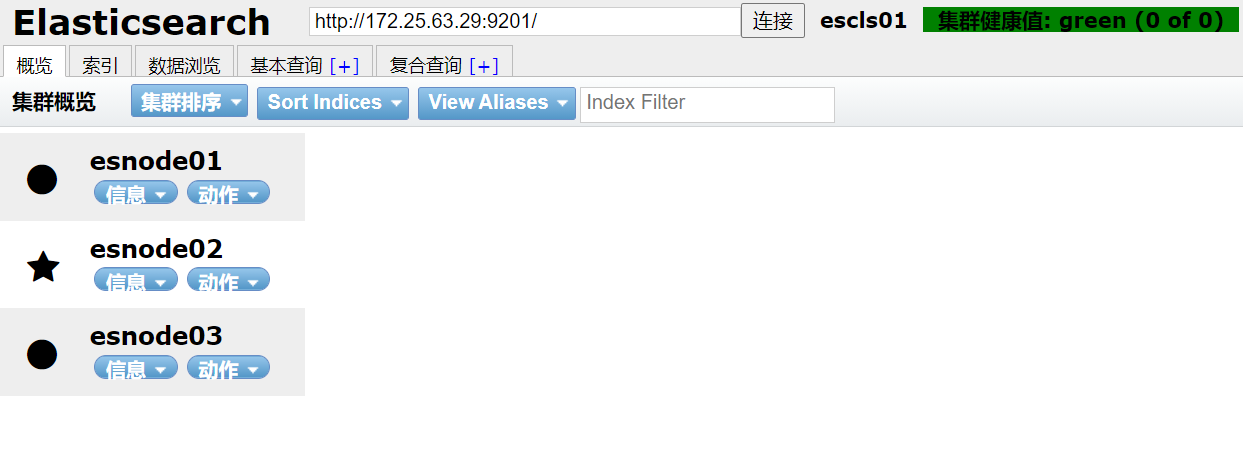
打开 http://172.25.63.29:9100/,在连接处填写:http://172.25.63.29:9201/ ,点击 连接 即可。
注:
默认打开 http://172.25.63.29:9100/ ,服务器连接地址处显示:http://localhost:9200/ , 可以修改/usr/elasticsearch-head/_site/app.js , 查找localhost关键字修改即可。
8、网页中创建测试索引,创建几个索引测试一下,如下:
test-index01 5分片,1副本
test-index02 5分片,2副本
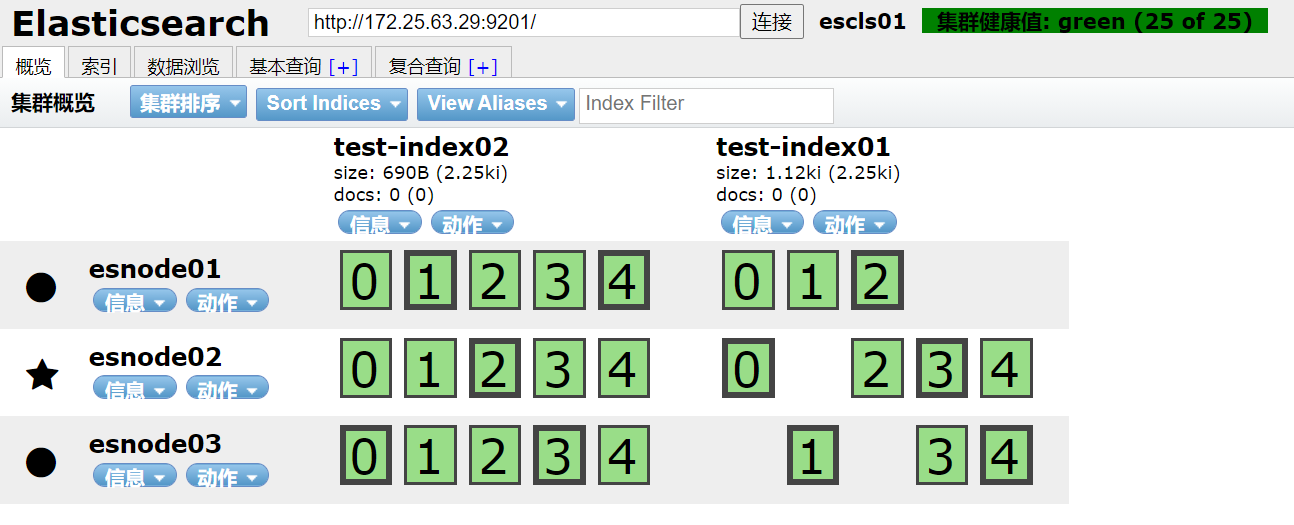
日志信息 #tail -f /usr/es01/log/escls01.log :
==> es01/log/escls01.log <==
[2021-06-10T15:48:10,016][INFO ][o.e.c.m.MetaDataCreateIndexService] [esnode01] [test-index01] creating index, cause [api], templates [], shards [5]/[1], mappings []
[2021-06-10T15:48:10,738][INFO ][o.e.c.r.a.AllocationService] [esnode01] Cluster health status changed from [YELLOW] to [GREEN] (reason: [shards started [[test-index01][1]] ...]).
[2021-06-10T15:48:55,716][INFO ][o.e.c.m.MetaDataCreateIndexService] [esnode01] [test-index02] creating index, cause [api], templates [], shards [5]/[2], mappings []
[2021-06-10T15:48:57,133][INFO ][o.e.c.r.a.AllocationService] [esnode01] Cluster health status changed from [YELLOW] to [GREEN] (reason: [shards started [[test-index02][3]] ...]).
9、配置kibana部分
#cd && cd soft
#tar -zxvf kibana-6.3.1-linux-x86_64.tar.gz && mv kibana-6.3.1-linux-x86_64 /usr/kibana && cd /usr/kibana
#vim config/kibana.yml
server.host: "0.0.0.0"
elasticsearch.url: "http://172.25.63.29:9201"
xpack.security.encryptionKey: "add_32_characters"
xpack.security.sessionTimeout: 600000
xpack.reporting.enabled: false
xpack.reporting.encryptionKey: "add_32_characters"
//启动kibana
#nohup ./bin/kibana &
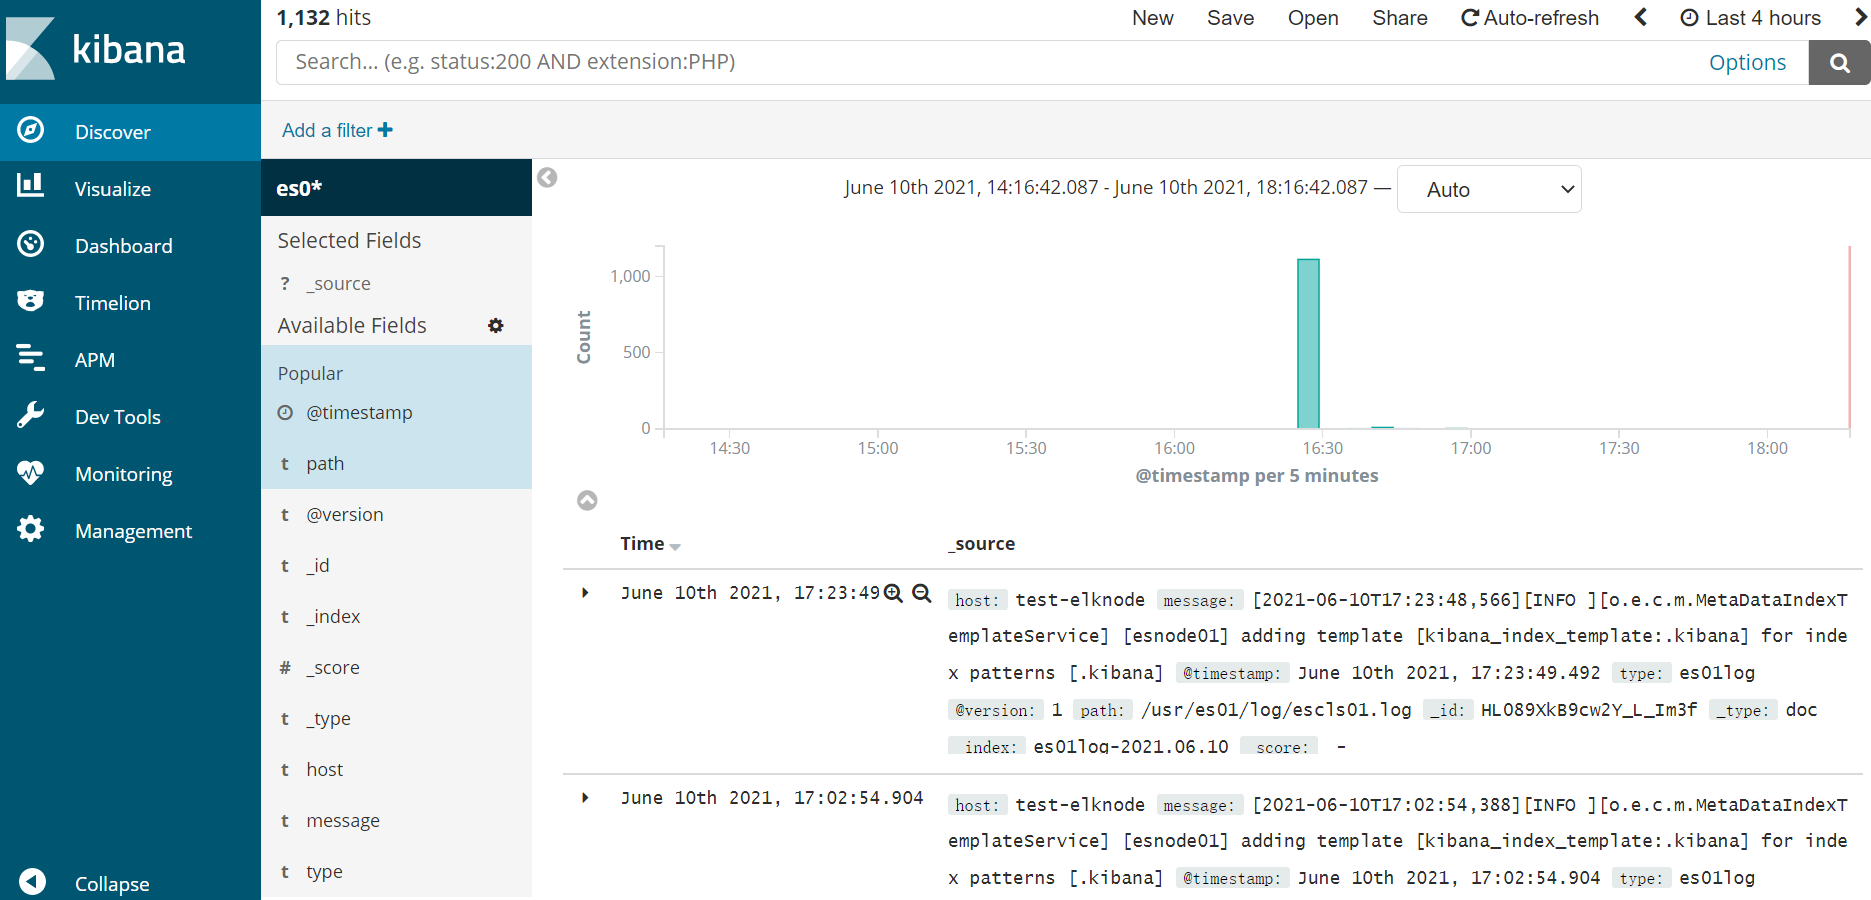
访问:http://http://172.25.63.29:5601/
到目前为止,我们启动了8个相关服务端口了,如下:
# netstat -ntpl
Active Internet connections (only servers)
Proto Recv-Q Send-Q Local Address Foreign Address State PID/Program name
tcp 0 0 0.0.0.0:22 0.0.0.0:* LISTEN 1021/sshd
tcp 0 0 127.0.0.1:25 0.0.0.0:* LISTEN 1002/master
tcp 0 0 0.0.0.0:5601 0.0.0.0:* LISTEN 13233/./bin/../node
tcp 0 0 0.0.0.0:9100 0.0.0.0:* LISTEN 12774/grunt
tcp6 0 0 172.25.63.29:9201 :::* LISTEN 11719/java
tcp6 0 0 172.25.63.29:9202 :::* LISTEN 13077/java
tcp6 0 0 172.25.63.29:9203 :::* LISTEN 12106/java
tcp6 0 0 172.25.63.29:9301 :::* LISTEN 11719/java
tcp6 0 0 172.25.63.29:9302 :::* LISTEN 13077/java
tcp6 0 0 172.25.63.29:9303 :::* LISTEN 12106/java
tcp6 0 0 ::1:25 :::* LISTEN 1002/master
10、配置logstash部分
#cd && cd soft
#tar -zxvf logstash-6.3.1.tar.gz && mv logstash-6.3.1 /usr/logstash && cd /usr/logstash
//此处我们先增加logstash监控本机三个es节点的日志信息
#vim config/logstash.conf
input {
file {
type => "es01log"
path => "/usr/es01/log/escls01.log"
start_position => "beginning"
}
}
input {
file {
type => "es02log"
path => "/usr/es02/log/escls01.log"
start_position => "beginning"
}
}
input {
file {
type => "es03log"
path => "/usr/es03/log/escls01.log"
start_position => "beginning"
}
}
output {
stdout {
codec => rubydebug { }
}
if[type]=='es01log'{
elasticsearch {
hosts => "172.25.63.29:9201"
index => "es01log-%{+YYYY.MM.dd}"
}
}
if[type]=='es02log'{
elasticsearch {
hosts => "172.25.63.29:9202"
index => "es02log-%{+YYYY.MM.dd}"
}
}
if[type]=='es03log'{
elasticsearch {
hosts => "172.25.63.29:9203"
index => "es03log-%{+YYYY.MM.dd}"
}
}
}
//启动logstash
#nohup ./bin/logstash -f ./config/logstash.conf &
//到目前为止,我们启动了9个相关服务端口了,如下:
# netstat -ntpl
Active Internet connections (only servers)
Proto Recv-Q Send-Q Local Address Foreign Address State PID/Program name
tcp 0 0 0.0.0.0:22 0.0.0.0:* LISTEN 1021/sshd
tcp 0 0 127.0.0.1:25 0.0.0.0:* LISTEN 1002/master
tcp 0 0 0.0.0.0:5601 0.0.0.0:* LISTEN 14488/./bin/../node
tcp 0 0 0.0.0.0:9100 0.0.0.0:* LISTEN 14356/grunt
tcp6 0 0 172.25.63.29:9201 :::* LISTEN 13541/java
tcp6 0 0 172.25.63.29:9202 :::* LISTEN 13681/java
tcp6 0 0 172.25.63.29:9203 :::* LISTEN 13804/java
tcp6 0 0 172.25.63.29:9301 :::* LISTEN 13541/java
tcp6 0 0 172.25.63.29:9302 :::* LISTEN 13681/java
tcp6 0 0 172.25.63.29:9303 :::* LISTEN 13804/java
tcp6 0 0 ::1:25 :::* LISTEN 1002/master
tcp6 0 0 127.0.0.1:9600 :::* LISTEN 14207/java
11、到此我们测试环境es单机多实例,elk环境的部署就完成了,访问:http://http://172.25.63.29:5601/
到此完成!
